Babington Style Waste Oil Burner
This Blog on the Babington Burner is in reverse order. My first entry is back in 2014 and is at the bottom. My latest update is immediately below. If you want to see how I get here… go the first article at the bottom and work your way up!
Revised 1/8/19
About time I get back on this blog!
The break through was to use a propane pilot flame. I attached a 1/2" pipe coupling to the side of the 2" pipe coupling, and inserted a propane torch head into the bushing and secured it with a screw. The torch shoots a flame into the 2" coupling. The propane burner is just a standard premium propane torch with an adjustable flame (about $50) that you would normally attached to a disposable propane tank. I used a hose and ran it to a standard 100 lb propane tank that I had. A 20 lb tank would have been plenty. The torch is about 2000 btus meaning it will run for about 40 hours on 1 gallon of propane. This maintains the flame when so if the oil flame burps for a second, everything doesn't shut down. Works great, and solves all kinds of problems. Also makes automatic relights possible, so I can turn off the burner when the garage gets to hot, then cycle the burner back up since the pilot flame is still there. Way too simple! And yes, I have a thermostat attached to the PLC, to trigger the restart when the temp drops.
Regarding the controls, things are simpler. I only have an air on/off valve now. No propane gas preheat. The pilot flame keeps the tube warm enough no preheat is required once everything is lit. The pressure is set between 20 and 25 psi and that can vary for heavy or less heavy oil. The amount of oil flow is fairly constant with the constant flow pump between 20 and 70 degrees. However you will need to play with it to figure out what is the proper flow. Its pretty obvious as if you have too much the flame smokes, too little and the flame looks lean. You also don’t want to overfire your stove. Too much heat, > about 750 degrees is simply too hot. If it gets that hot you will want to lower your oil flow. If the stove heats up to about 700 degrees and then the burner starts cycling on and off to maintain the temp in the room, then you are in very good shape.
I'm also going to add a water trap that is after the positive displacement metering pump. This will be very simple. A 2" piece of pipe held vertically. Oil will go in just above center and the oil to the burner will come out the top. Any water mixed into the oil should fall out and drop to the bottom of the pipe... where there will be a drain.
Water in the oil has been a consistent battle. It has to be trapped prior to the positive displacement pump and after it.
This system really proved itself last winter when I went through about 250 gallons of oil with very little maintenance. The pipe downstream of the 2” Tee does collect soot after a while and it needs to be cleaned out. It’s more of an annoyance than anything else.
Revised 3/12/18 Had a break through this weekend which has improved everything beyond my expectations.
Results so far:
\1. No flame outs even with crappy oil.
\2. Greatly improved combustion which has resulted in higher flame temperature, a closer to white, light yellow flame, which has resulted in less ash formation in the burner tube. I'm not sure when it will need to be cleaned out. I will run 15 gallons or so through the burner and then look at the results. The only ash I am seeing is light, white powder.
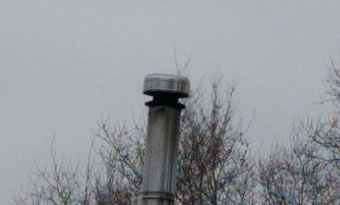
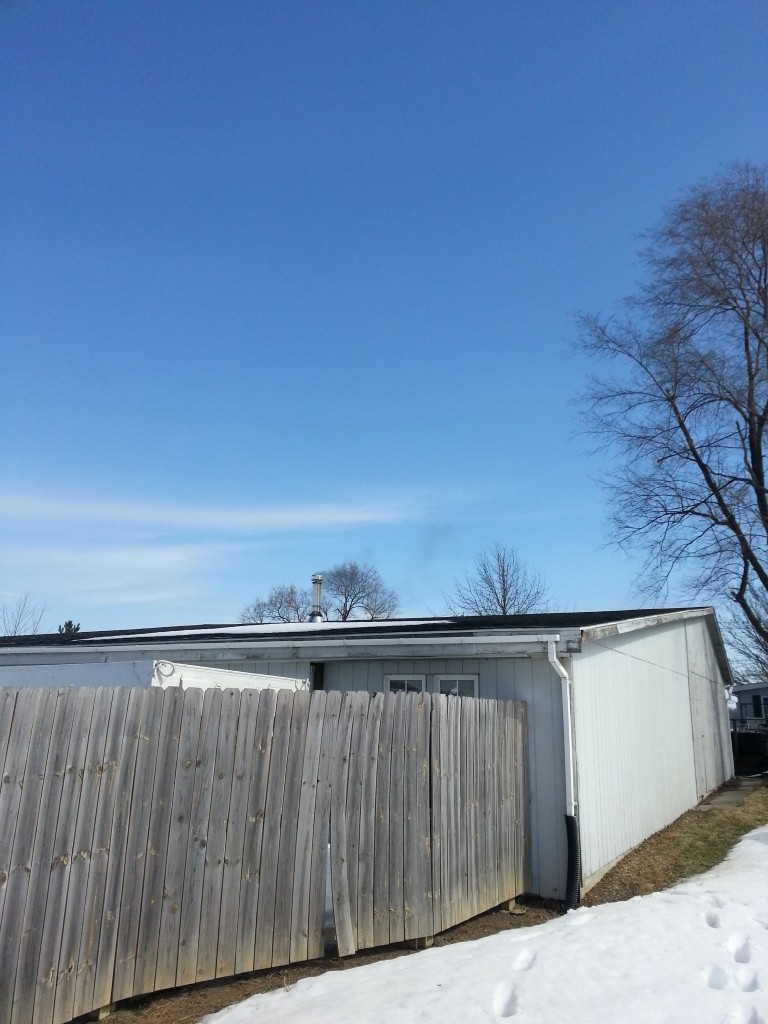
\3. The improved combustion is evident in the stack emissions. I can't see any! Not even a smudge of darkness from the stack. It looks like I am burning natural gas!
\4. Simpler controls - basically little to no preheat with cold motor oil. I started the burner this morning with no preheat and the motor oil and surrounding air and metal was at 25 degrees F this morning.
Did you get that, no preheat, with cold motor oil! Yes, I'm excited!
This is the stack emissions running full tilt:
Do you see the smoke... nope, neither do I and there is no wind outside today.
Compare this solution to the other popular waste oil burner solutions out there right now. The Delavan siphon burner conversions require a Beckett burner, a preheater block with electrical controls, a tank which is preheated and it has to be level, etc. The Beckett burner still needs compressed air, as does this solution. The Beckett burner solution will not burn just any oil, it needs to be motor oil or lighter. No gear oil. This burner is running off a mix of motor oil, mostly synthetic, gear oil, and a small amount of auto trans fluid. Which is also mostly synthetic. That's the advantage of the Babington atomizer. Its very tolerant of oil. Also, I can still turn down this burner as well. I'm not sure how far, but I know I can turn it down it down at least 50% without issues. Finally, this burner is made from pipe fittings, as you can see. The most sophisticated thing about this burner is the controls and I did that because its easy for me to change for experimentation purposes. I think a Arduino Uno and a few relays could run this thing without issues.
So what did I do?... Well I need to do more testing with this setup to make sure its as good as it looks before I let you know.
But at this point, it appears to be a Voilà moment.
I've run about 5 gallons of oil through it so far and it just hums along.
Ok, so you don't get to this point without finding out what doesn't work.
So I found another thing that doesn't work this weekend:
I put a tee into the fuel inlet side of the metering pump and I setup selector valves so I could choose between motor oil or kerosense. My thinking was that I could use kerosene or diesel to preheat the burner and then switch to used motor oil. The problem is that volume of oil in the pump and the volume of oil in the hose means that I need to prime the heck out of the system before I can get kerosene at the burner for preheat. That takes time, and quite a bit of time. So this was a non-starter. It makes no sense to have to prime for 10 minutes to get kerosene to the burner for preheat. Oh well. Compared to my use of Propane for preheat, the Propane was much easier to switch in and out with air.
Revised 2/22/18 Added another air regulator to the 3 position manifold so now I have low pressure air, high pressure air, and propane looking at the valves from left to right. On startup, the propane starts and heats the burner tube for 5 minutes, then low pressure air (about 25 psi) comes on and also the oil pump starts running. After 30 minutes, the low pressure air is turned off and the high pressure air (about 40psi) is turned on and allowed to run for about 5 minutes. This leans out the flame but it doesn't blow it out. This gets rid of most of the ash buildup in the burner tube. I haven't run it enough to see just how much less as is formed, but it is very substantial. I will continue to tweak the high pressure air settings and see how high I can run it without blowing out the flame. I know that air at 120 psi is simply too much. 40 works and perhaps 60 psi will work as well. We will see.
Investigating hacking an infrared thermometer that I can read with the PLC to get the stove temperature as a safety. As long as the pump does not run away there is almost no way that the stove can overfire since the stoves temp is dictated by the oil flow which is precisely metered by the furnace oil pump.
I can start up the stove and the stove will climb in temp to 700 degrees and just stay there. The oil flow is that consistent.
Revised 2/17/18
Further refinements:
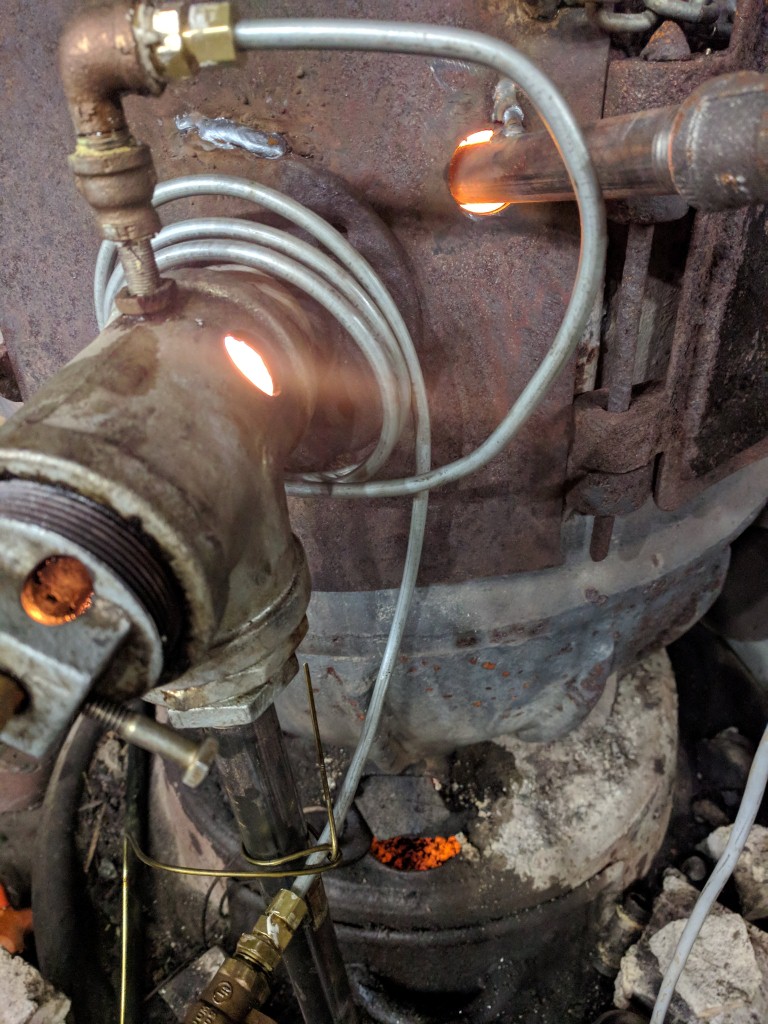
After running 15 gallons of oil through the stove, I was having a hard time relighting after it was cold (in the low 30's) Even though I had the induction hotplate under the oil tank which was effective at heating the tank, I was still having problems lighting off the burner. I extended the propane preheat time to 5 minutes and still had some flameouts - which was not a problem since the flame detector caught it and shut things down. However I then realized that although the oil in the tank was 100+ degrees, the furnace only uses about 1.5 gallons of oil per hour and the pump sits on the very cold ground. So the pump was cooling off the heated oil from the tank. By the time the oil got to the top of the burner, it was in the low 40's - way too cold. Thinking back I remember someone using loops of tubing around their burner to bring the oil up to temperature. I dived into the junk pile and found 4 ft of new steel, 1/4" brake line. I also found some brass 1/4" compression fittings. So I wound about 3 ft of the tubing so it would fit around the burner, and removed the induction heater. I primed the feed tubing and fired up the burner on propane again. 5 minutes later it switched to the oil and it took right off. I watched the temperature of the oil feed tubing and it came in at about 40 degrees and entered the burner at just under 100 degrees. This is with the wall of the furnace running at 550 degrees or so. So that is a very safe temperature for the oil. In fact it could be a lot hotter. About 200 degrees would be ideal so it might be better to go with 6 ft of steel brake line rather than 4 ft of steel brake line. But for now this fixed a number of things and simplifies the design even further. With the higher incoming oil temperature vaporization looks even better in the stove. Better vaporization in the burner should minimize ash build up in the burner as well.
Heating loop of steel brake line:
Filter addition:
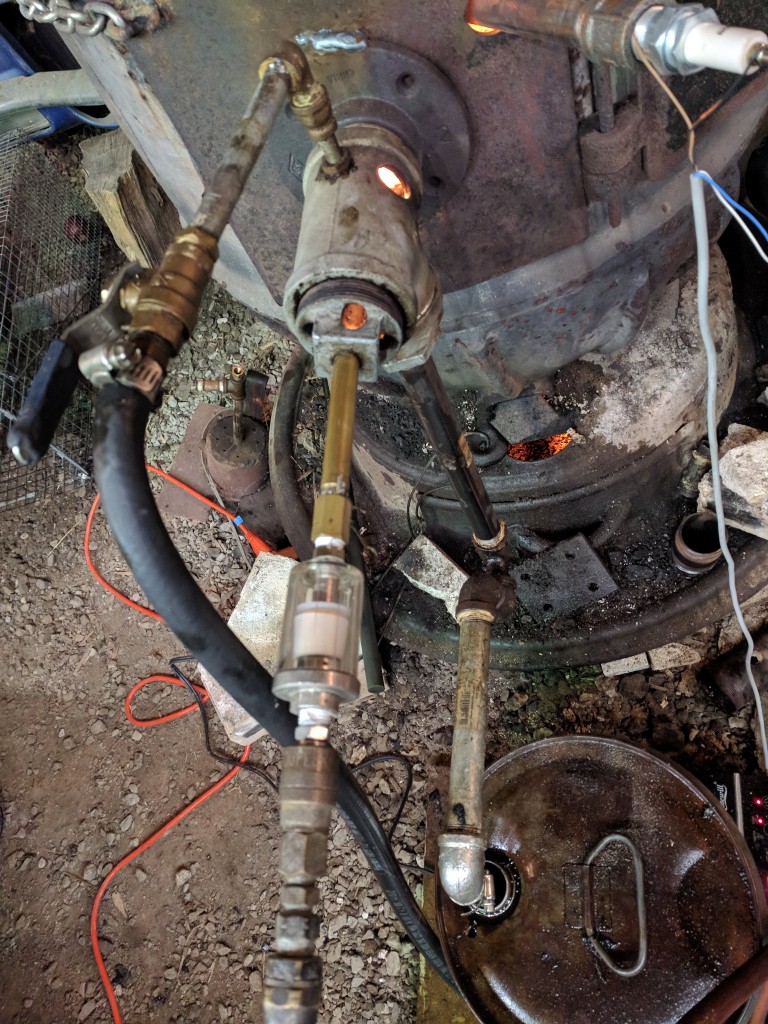
Also, I had a problem with the small .015 jet clogging in the Flare cap nozzle. So I remove the pipe plug with the brass gas/air pipe and blew it out and attached a filter that I had from my burner #1 project long ago. That should prevent future jet clogging issues.
Revised 2/16/18
Installed the Siemens S7-1214C PLC for the burner control. That was a good move. I attached a Linksys Media connector to the S7-1214C and linked that to the Wifi router that is in my barn. Now I can remotely program and monitor the PLC/Burner control remotely via my laptop without cables. I also have a tablet with a free app on it that allows me to monitor the PLC values wirelessly for troubleshooting. Very handy for debugging and trying new things.
I setup a flame detect circuit. I had a 12 volt DC power supply so I did this.. +12V ---WW---|----flame rod 0V. The W's is a dropping resistor. I think I used a 150K 1/4 watt resistor. The "|" is the connection to the Analog input on the S7-1200 and the M common connection was made to the burner flame tube. I looked at the value of the analog input with no flame and then fired up the burner and the analog input changed substantially. It takes about 30 seconds for the flame to make a solid electrical connection between the flame rod and the burner tube but then the flame resistance drops substantially which changes the analog input voltage by about 10% which is plenty to allow a reliable flame detection. Note that the flame rod is positive. That works best. With a little experimenting I have found that this method of flame detection is very reliable and that is with burning waste motor oil. But it also works with the Propane preheat flame. So success! I now have a flame out safety so the PLC can shutdown the pump if the flame goes out.
So the last thing is the overheat detection. I have one spare Analog input on the 1214C left but I am going to attach a multichannel analog input module so I can have more than one temperature sensor for redundancy. Thermocouple modules for the S7-1200 are really expensive. I have no idea why. So I will likely go with some used Omega Thermocouple transmitters that are on ebay for about $25 each. I will need two or three so I can monitor the furnace redundantly for over temp and also the stack temperature. Another way to go would be to use some WaterHeater thermostats mounted to aluminum panels and placed around the furnace. Once the radiant heat becomes too great the thermostats would open and that could signal the PLC to trigger a shutdown. Water heater thermostats are really cheap - like $15 each and they are likely very reliable. However they don't actually tell you how hot the furnace is either so that is a great compromise for better control.
Maintenance:
So it appears that the burner tube needs to be cleaned out very 5 gallons of burned oil. Doing that requires the burner to be shutdown, disconnect the gas/air supply quick disconnect, unscrew the 2" pipe plug and push the ash out of the burner tube with a 1" diameter steel rod. It all takes maybe 5 minutes including relighting the burner. The burner goes through about 1.5 gallons of oil per hour so that means about every three hours it needs to be cleaned. If it is not cleaned I think the flame will just go out triggering a shutdown. I think it is good to test the shutdown frequently so I may just let it run out of the 5 gallons of oil and then let me know via the shutdown.
Revised 2/7/18
Installed a flame rod purchased off Ebay for $10 plus shipping so it is directly in the path of the flame. Hooked up my Maxx Tronic flame detector board that you can see in the picture just above the manifold and began testing. Didn't go so well. The Maxx Tronic board I bought from China or Taiwain a few years ago is junk. When it did detect a flame, it was erractic in its operation regardless of the pot setting. On top of that, although the relay was clicking, the NO output was always on...although the NC output was going on and off !?! Junk. Oh well.. So I used my Fluke meter to see if I could distinguish any electrical changes when the flame was on vs off and sure enough, the flame is conductive between the ground/flame retention tube and the flame rod! I measured between 100K and 300K ohms with the value varying with the flame. The usual method of detecting a flame is to put an ac voltage between the flame rod and another part in contact with the flame and then look for a small DC voltage. The flame tends to act as a rectifier. Perhaps that is what my meter was detecting ... regardless, the flame is somewhat conductive to DC voltages.
So this might work - an Arduino setup to measure the flame resistance. Fairly cheap at $15 for the Arduino and a reference resistor. A 250K should work. This would be cheaper than trying to guess if a second Maxx Tronic flame detector board would work or not. Plus I have an Arduino collecting dust. http://www.circuitbasics.com/arduino-ohm-meter/
Or I could use an analog input on a PLC and do basically the same comparison via a voltage divider. I have an S7-1214C PLC sitting here that can do that and takeover the functions of the Click PLC. Or I can add a $90 Analog input module to the existing PLC and do the same thing... hmmm...
I'm doing this for the long run as I have been at this burner project now for 4+ years on and off. Safety is paramount so the increased cost of the PLC is really insignificant in the big picture.
Anyway, the less learned is to avoid Maxx Tronic... its junk.
For reference - Here is a link to a safety made for a burning man display that uses propane. https://www.pjrc.com/pilot-light-flame-sensor-for-burning-man-art/
This seems to be a bit of an overkill if I can just look for flame conductivity without the AC component. It doesn't appear to be required to sense the flame.
Revised 2/6/18
Further work has occurred on this burner and more things have been learned. I'm still using the same Automation Click PLC and the Siemens VFD drive. I tweaked the drive to provide better low speed torque, that is a requirement as the motor was bogging down with thick oil when it was cold.
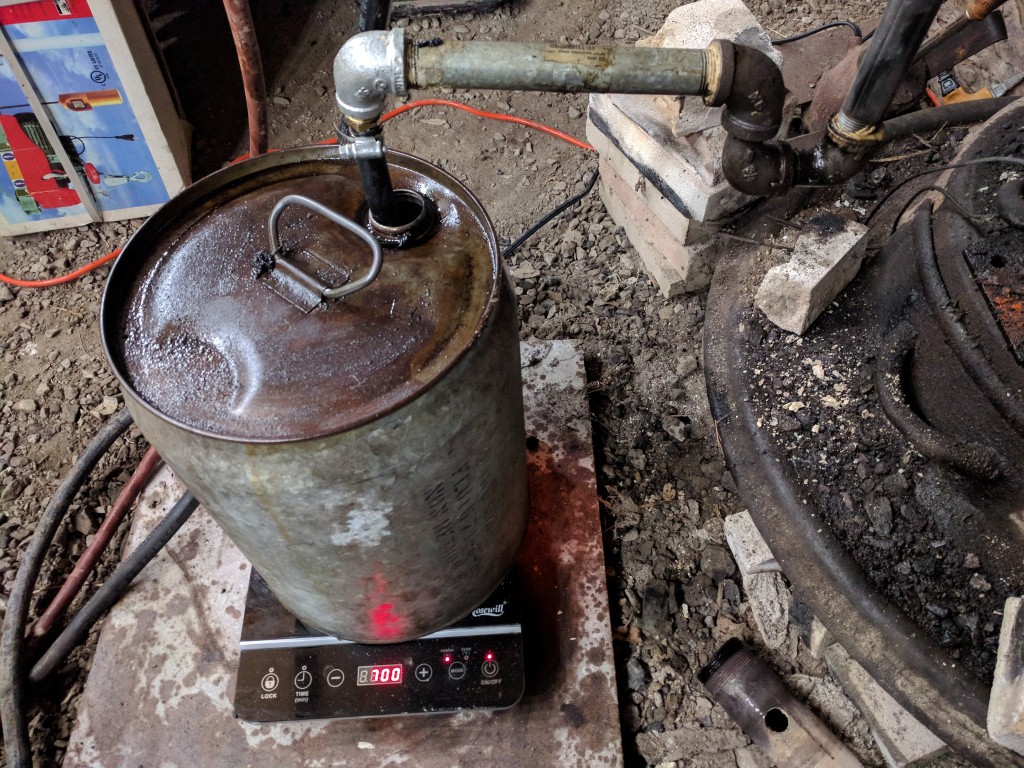
However I have realized that heating the oil is a requirement to make this burner consistent.
Last year I bought an induction hot plate and I simply put that under the 5 gallon can. Now I can heat up the 5 gallon can in a controlled manner. It can heat by a watts setting or a temperature setting. If I set it for 150 degrees I can walk away from it and it will heat it to exactly 150 degrees. I bought the induction hot plate off Amazon for $40 or so. The plate is a Rosewill brand plate.
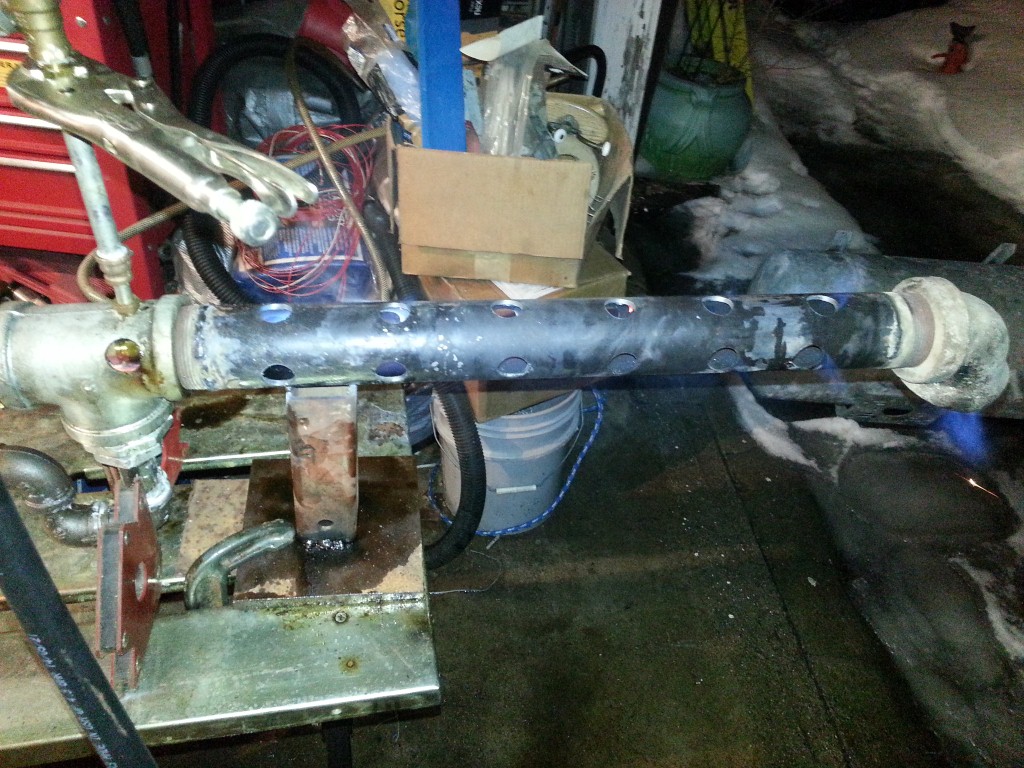
I also gave up on the perforated burner tube. The tube worked fine except that it would clog with soot and cinders quickly and it could not be easily cleared. I tried different lengths of straight burner tubes and ended up going with a 6" length of 2" pipe. That is long enough to retain the flame yet but not so long to make it hard to clean.
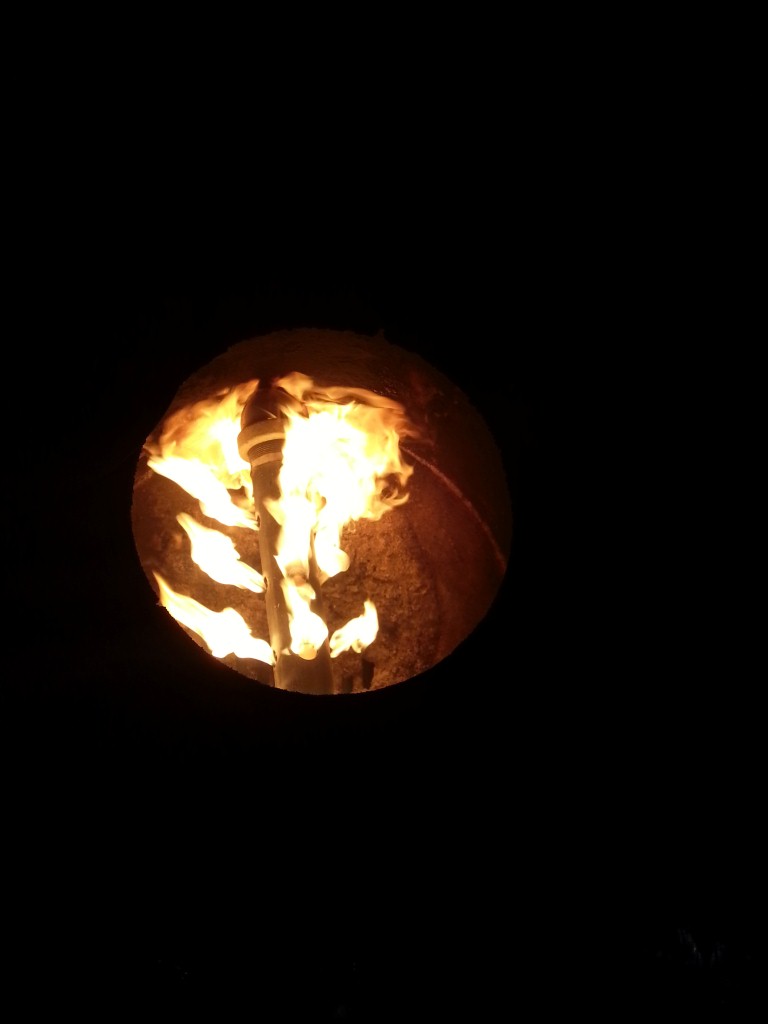
Here is the burner operating with the new straight burner tube and the resultant flame in the cast iron stove. The flame shoots right across the stove so I put some sheet metal leaning up against the opposite side so the flame would not impinge on the cast iron of the stove. The new straight burner tube is easy to clean out by disconnecting the gas connection and unscrewing the plug in the back of the burner. The soot is then just pushed into the stove with a steel rod to clear the burner tube. Its a 3 minute operation and it can be done with everything hot. The burner has to be cleared after burning about 5 gallons of oil, which is about every 3 hours.
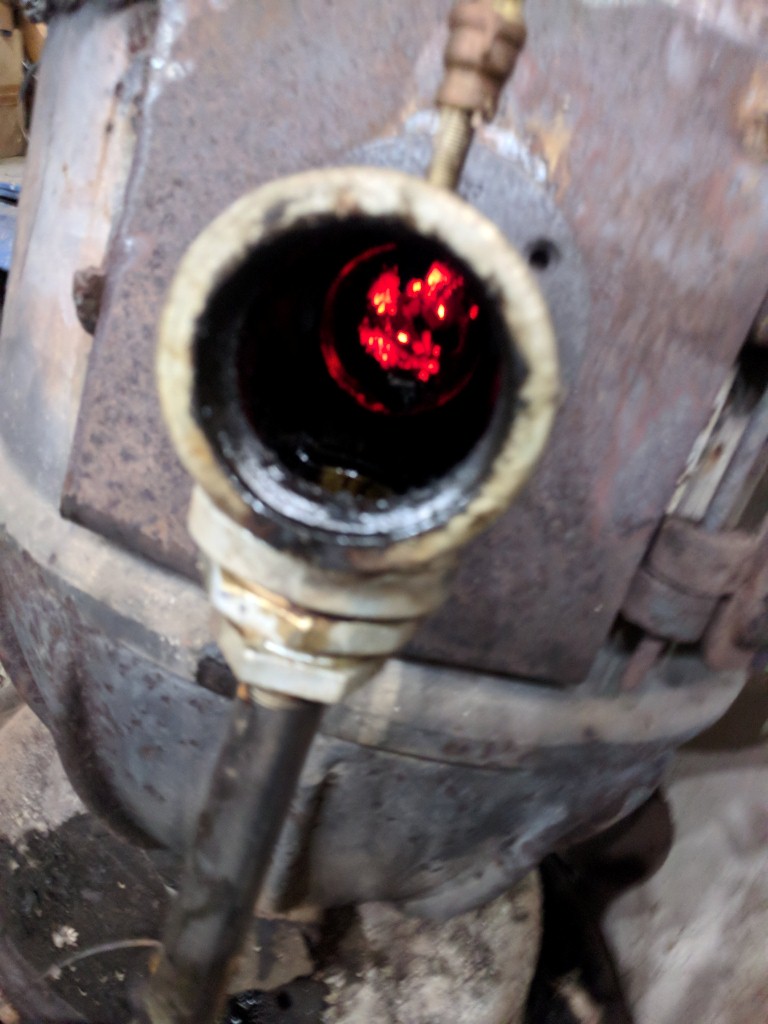
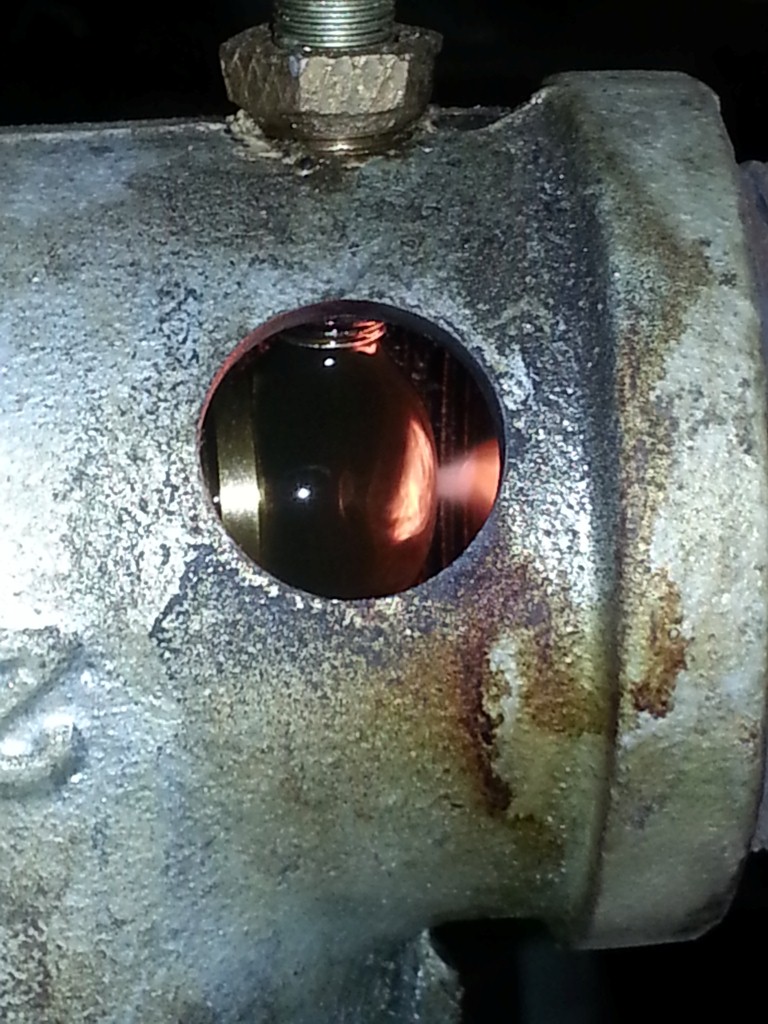
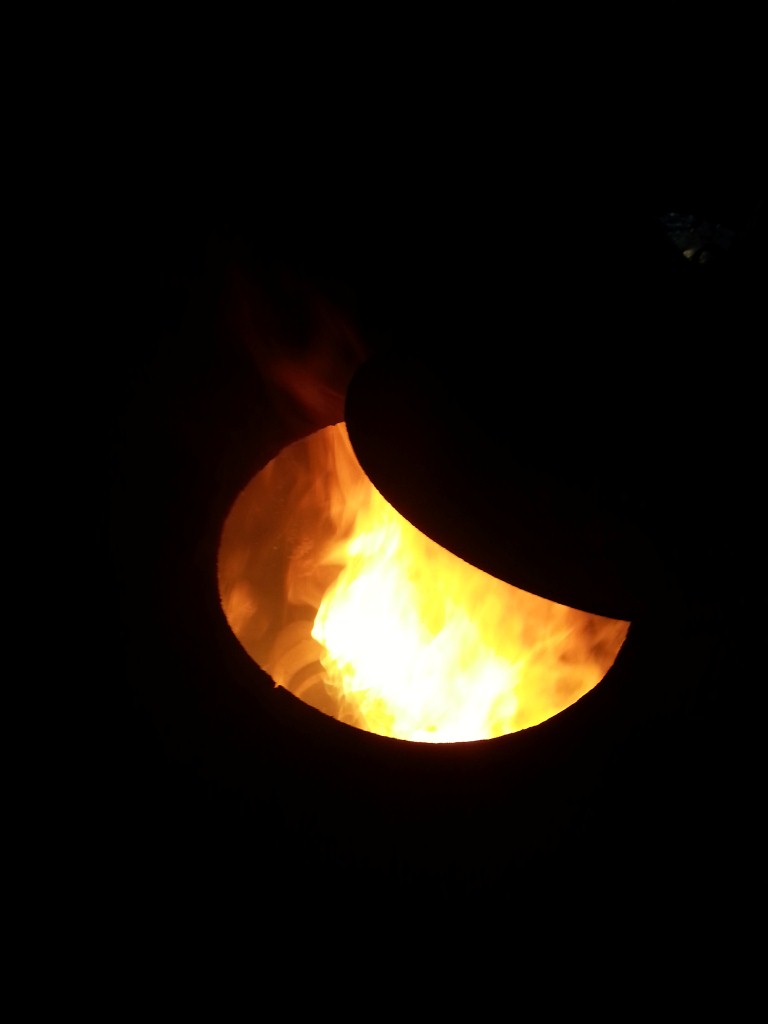
Here is the view looking in the straight burner tube with it clogged with soot.
I added a filter to the intake of the gear pump. The pump has a strainer built into it inside the pump itself and it was getting clogged with junk. This oil furnace filter is cheap and easy to clean and external to the pump.
To further fight the clogging issues in the pump (the burner doesn't clog, but the pump does) I am now filtering the oil I pump into the 5 gallon can. I use a hydraulic filter that is rated for 10 microns and I pump oil though the filter with a 3:1 air powered pump that Harbor Freight used to sell for about $100. The pump has been great and just works even with heavy cold oil. It has enough umpf to push oil thick oil through the 10 micron filter at 2-3 gallons per minute which is plenty fast when refilling the 5 gallon can.
One more thing I did was to add a damper to the stack. The stove was drawing too much air and sucking too much heat up the stack. The damper slows the exhaust gas and allows me to fine tune the stack temp. I use an infrared cheap thermometer to measure the temps. With this setup I can heat the stove to about 700 degrees and that is a good temperature. At that temp I can heat much of the uninsulated space in my garage which is over 2000 sq ft to about a 40 degree temp rise above the outside temp.
My next thing to add is a flame rod which will detect when a flame out occurs in the burner and shutdown the pump and beep an alarm. Flame out normally only occurs when the burner tube becomes plugged with soot. I already have a flame detector board in the controls for use with a flame sensor.
I may try something else to control the soot buildup in the burner tube. After the burner has been running for 10 minutes or so the burner tube is plenty hot enough to retain the flame.. its over 1000 degrees at the end of the tube. If I am running 25 psi of air and the pump is at 4.7 hz I can get 700 degrees on the stove. If after two hours of operation the soot begins building up the flame will be restricted and the burner flame will start to back up in the burner tube. If I raise the air pressure to 90 psi for a few seconds it will tend to blow the soot out of the burner. I have three positions on the manifold so I could automate this and blow out the tube every hour or so to try and keep it clear. If I do that I can probably run the burner for 8+ hours without any maintenance except to refill the 5 gallon tank.
This soot build up issue is a problem with most motor oil burners. There is a pot burner design where he incorporated a powerful motor/gearbox to run a scraper inside the pot burner to clear the ash. Blasting in a bunch of extra air would be a LOT easier!
4/5/15
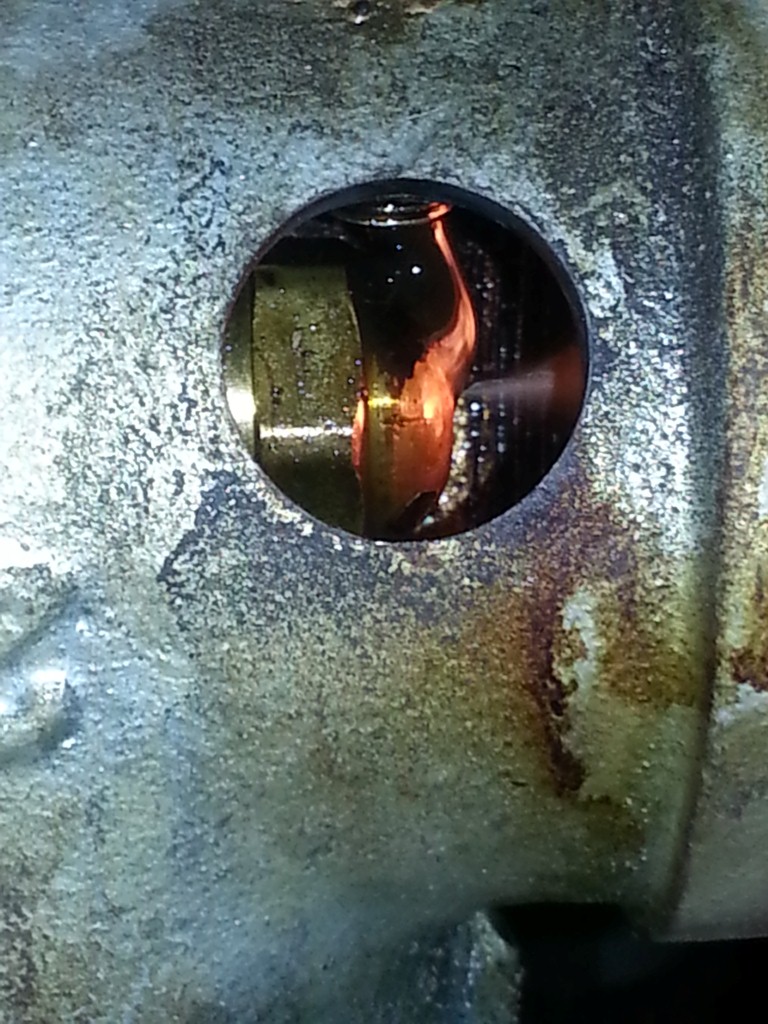
Did more testing last night. The oil was about 42 degrees so it was thick. The startup went ok but I noticed that the oil was quite viscous coming out of the vertical tube over the flare cap. Here is a pict of the oil globbing on the cap. All of the oil was being blown off the cap and there was no overflow off the cap so the flame was running rich and smokey. I moved the flare cap forward via the adjustment and then took the next picture. The oil is now spread over the cap and there is some overflow but still the flame was running rich.. The tank is near the stove and it only had a few gallons of oil in it so it warmed up quickly to 55 degrees or so and the oil thinned out and the burner started running right (little smoke). The oil became noticably thinner. In the second picture below you can see the oil appears quite black. Once the oil warmed another 15 degrees the oil color appeared amber and I could see the brass flare cap through it. So the oil was much thinner.
As the oil further heated the oil on the cap thinned and the atomization became better and the flame was even nicer. That process from cold start with temps in the low 40's to a really nice flame was about 20 minutes. I think this may be sufficient to justify an oil heater for the tank. If the oil was preheated to 90-100 degrees this burner would start with less smoke and be more consistent. Remember the goal is full automatic operation with this type of burner. This burner (unlike siphon burners) can't clog the nozzle so it should be very trouble free. I have a tank and some electric heating elements so I think I will set it up so the oil is heated. I could go the way of wrapping copper tubing around some part of the burner etc, but that would throw in more control variables and I don't need that.
Also, because of the varying viscosity of the oil (the flow was consistent due to the gear pump) I was able to turn down the speed of the motor and reduce the flow during the startup. The VFD (and most do) has an analog input on it so the PLC could slow the pump down during startup to compensate for the thicker oil, but I think that simply heating the tank might be more effective. Still thinking. If I control the oil temp, oil flow, air flow/pressure, this burner should be extremely predictable. Which makes automatic operation fairly simple.
4/4/15
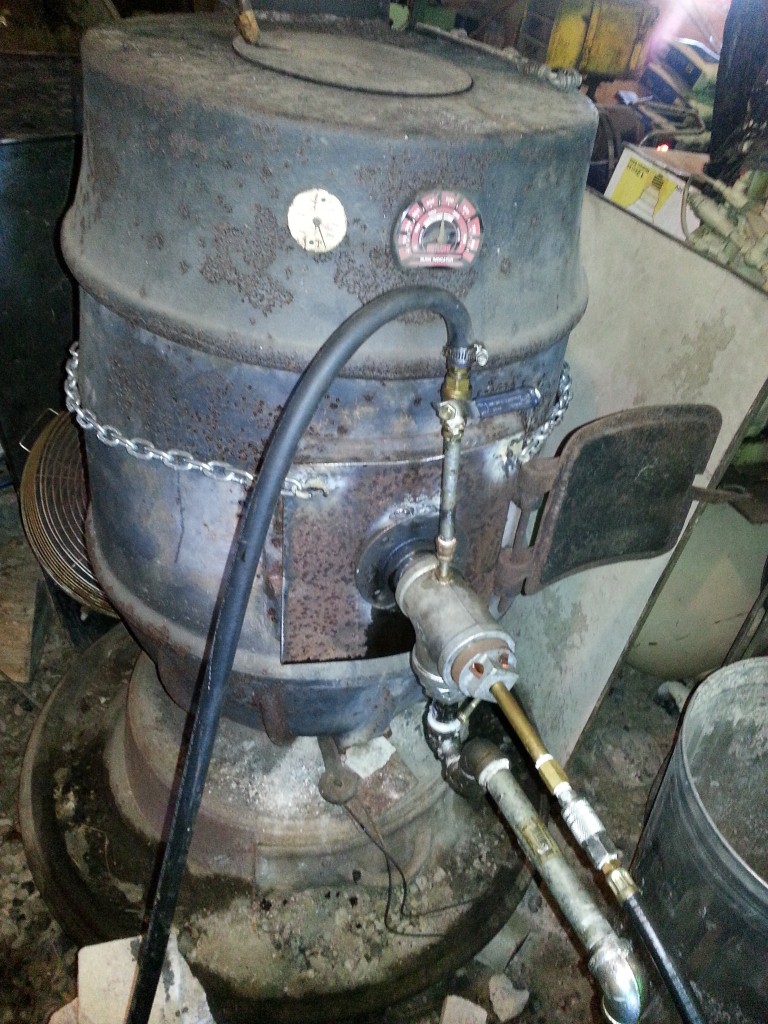
Further development: I have a new oil feed system that is very precise. A Nema 56 frame 3 phase motor is driven by an old Siemens Variable Speed drive. The motor is coupled to a Suntec J type oil pump with a Lovejoy coupling with a rubber insert. It runs very smoothly and is very precise and is easily controlled. A 5 gallon container is being used as the oil tank at the moment. I used the same tank for my gravity feed tests. But now the tank sits on the ground and the J type pump draws oil out of it. Any excess oil over the Babington type nozzle surface runs downward and trhough a J trap and then back into the same oil tank. This setup is really simple and very effective. This is a huge improvement over a gravity feed system since the pump is a positive displacement pump and the flow does not vary with changes in viscosity. A PLC has been added along with a gas management manfold using some 24 V DC valves. A pushbutton box has also been assembled. The controls have been assembled (mocked up) on a peice of white poly. When the controls design is done, everything will go into an electrical box. The PLC has been programmed to preheat the burner tube for 5 minute using propane at about 3 psi. After 5 minutes, the oil pump is turned on via the Siemens drive for one minute and the burner runs on propane and oil. Then after the minute times out the gas is turned off and air is turned on. After that no propane gas is required unless the burner is shutdown, in which case it will go through the startup sequence again.
This setup works well with the VFD running the 4 pole motor at about 8 hz and the air pressure at 12 psi. I also tried running the burner at 10 hz and 15 psi and that worked fine as well but I could see it was going to overheat the stove so I turned it down. (A good problem to have. :-) )
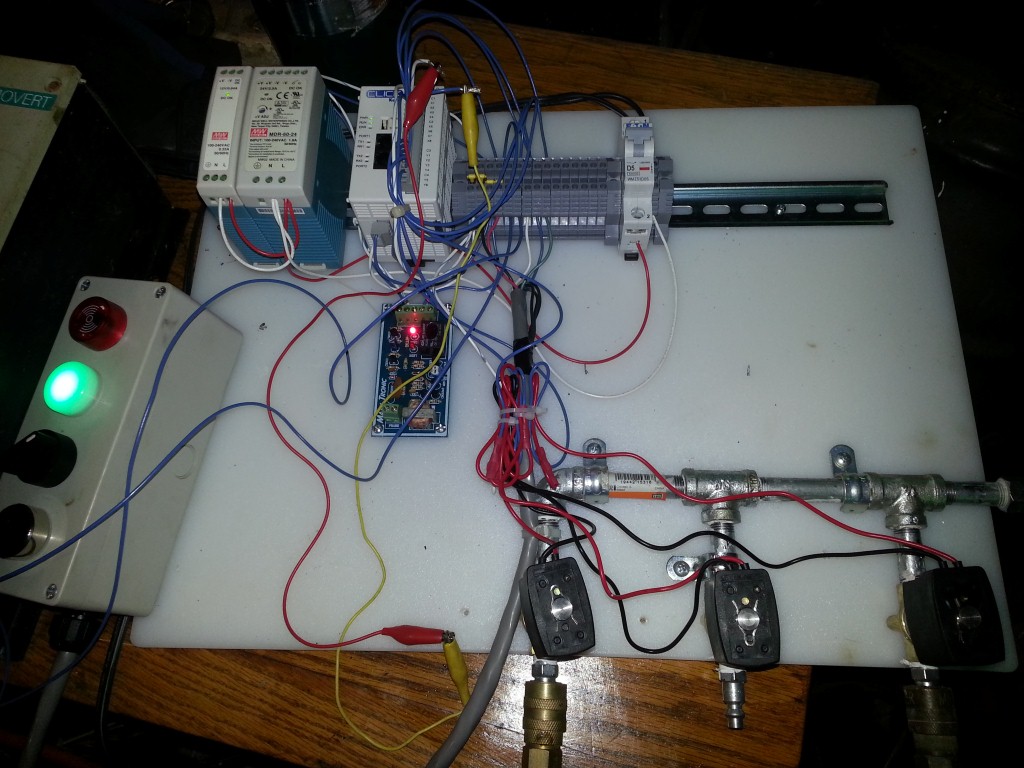
Here are some pictures of the latest setup:
Mockup of the controls on a poly board.
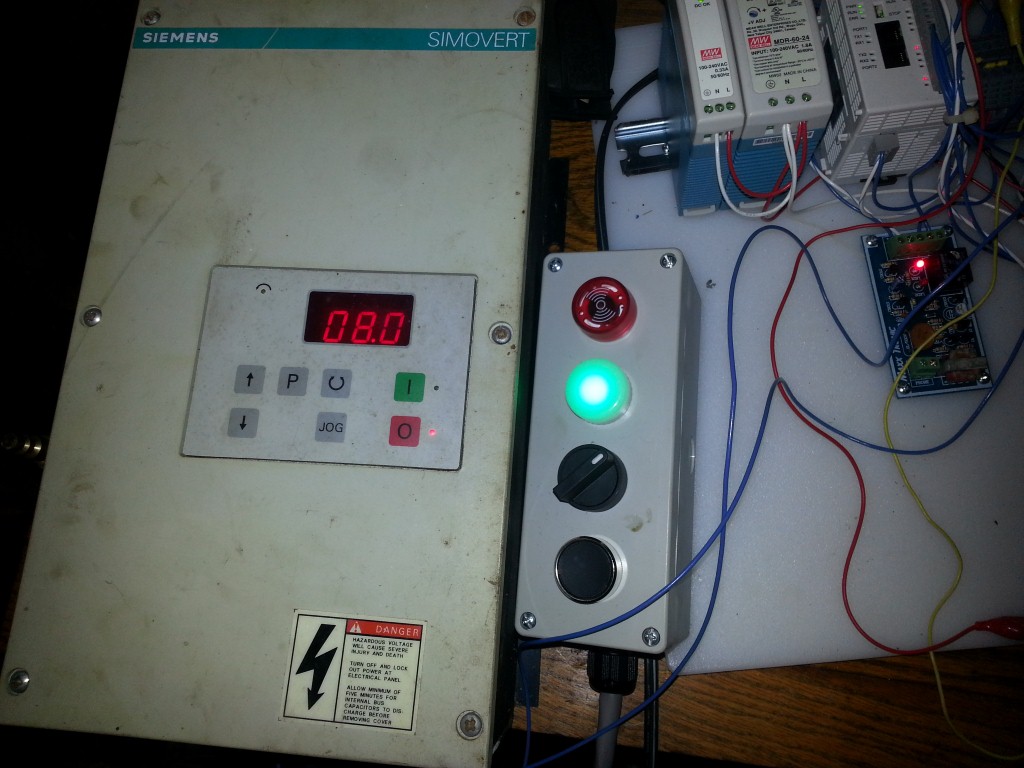
Variable Speed Drive
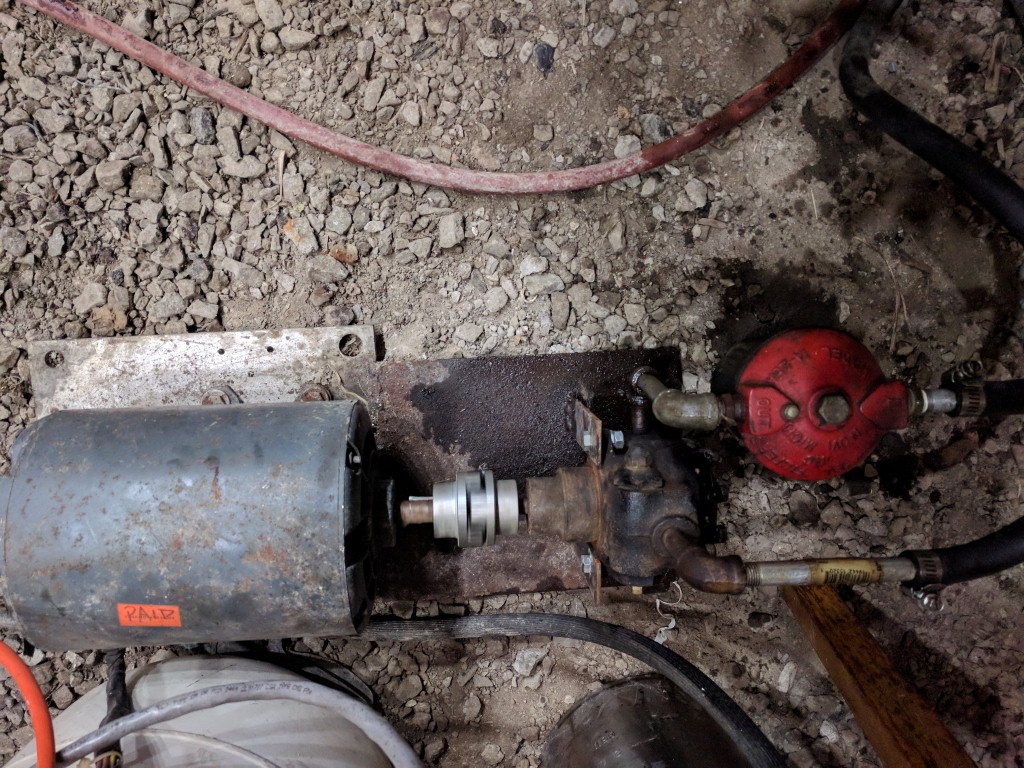
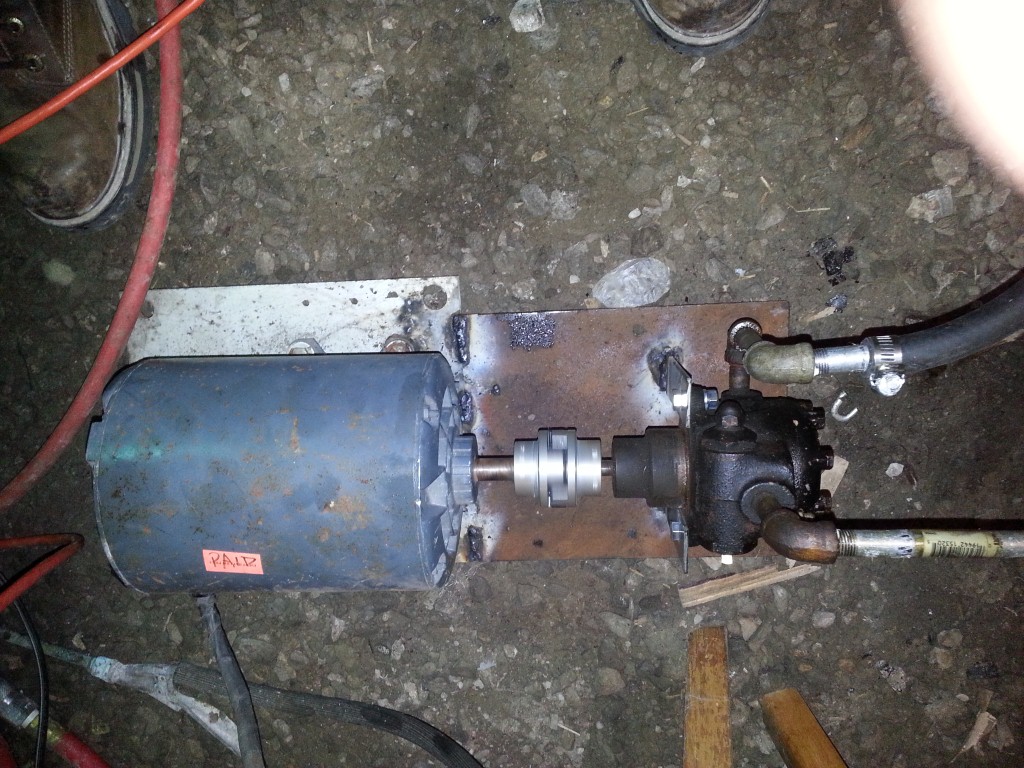
Motor and Feed pump setup running. Both are surplus equipment. The pump came off an old oil burner and the motor from a surplus store long ago. The coupling parts were bought off Amazon.
This setup with the VFD drive works very well and is very precise. This burner can be operated without something like this but it won't be as "tunable".
So.. what is left?
\1. Development of a pilot flame system that includes flame detection (I already have a board to do that in the control system.)
\2. Overtemp detection and shutdown safeties. These will be wired external to the PLC for increased safety. I want to put a switch on the stove and the stack.
\3. Installation of a thermostat in the heated space. Programming is already in the PLC to accept a thermostat.
\4. Installation of the working controls in a real electrical box.
\5. Setup of a larger oil tank (which I already have) to allow longer run times without refilling.
\6. Setup of a cart to mount the controls and pump on so it is semi portable.
3/8/15 - Major discoveries!
I made an adapter plate for this burner so I could fire this burner in my large potbelly stove. This stove is really large cast iron, about 4 1/2 feet tall, and several hundred pounds. It is probably near 100 years old and was used to warm a commercial shop with coal and wood. I used the iron flange shown above welded to a new door insert.
I fired the burner on propane and fed the burner oil via a gravity feed. It took a while to get the stove up to temperature, but after about 1/2 hr it hit 450 degrees at the stove's surface and I decided to see if I could run the burner on compressed air along, no propane. At this point the burner tube was a lot hotter than that, probably 600-700 degrees. I set the air regulator to 10 psi and quickly made the change from propane to compressed air without stopping the oil flow. The flame went out when I disconnected the propane and then relit when I connected the compressed air!
So what was going on?? And why did this not work before?? I believe it is because the burner tube was in a hot stove was the difference. The oil was also somewhat warmer than before also ( about 40 degrees F), but I think the difference was really the hot burner tube and the fact that it was in a hot stove (burner chamber) that was reflecting radiant heat back on the burner tube.
So this burner likes being in a hot stove / burner box. Temperature makes all of the difference. A hot burner tube means efficient combustion of heavy oil and easier firing.
I ran the burner for over an hour on just compressed air and tested it at various air pressures and oil flows.
Most of the testing was with the compressed air at 8-10 psi. At that pressure and with the flow optimized for a clean burn, I recorded an oil burn rate of 2 lbs - 12 oz in 30 minutes or 5lb - 8 oz per hour which is approx 150K btu per hour. At this rate the stove would maintain a nice surface temperature of about 450-475 degrees. However a couple of times the flow into the furnace decreased (being fed via a gravity feed) and the flame would sputter. A quick opening of the ball valve controlling the flow got rid of the blockage and then a readjustment of the valve regained the proper flow. This happened several times over a 1 hour period.
Later I decided to see how much heat this burner could put out in this stove and I increased the air pressure to 20 psi and adjusted the oil flow to make a nice hot flame. I estimate that the heat output doubled. The stove temperature quickly climbed well past 700 degrees and the stack temperature above the stove hit 600 degrees. Too hot! The stove was being overfired. I'm quite sure that this burner can maintain 300K btu output in the proper stove/boiler but this stove is not it! I shut the burner down and looked into the stove to see how hot the burner tube was and it was glowing a dull red color about 8 inches from the pipe tee.
Looking at this color chart: Steel Heat color chart It appears that the burner tube was in the 1100 to 1200 degree range. I never saw the tube get that hot when the burner tube was operated in free air outside of a stove.
Conclusions from testing of 3/8/15
This burner will burn waste oil using compressed air alone. However the burner tube must be very hot (preheated) and it needs to be in a "burner chamber" of some sort to maintain a high burner tube temperature. Propane can be used to bring the burner tube and fire box chamber up to temperature but it takes about 30 minutes which means 1-2 lbs of propane. Kerosene could likely be used as a liquid fuel to do the same thing instead of propane, but using propane at a few PSI of pressure along with waste oil is very simple and virtually a fool proof method of preheating the burner tube and fire box. So I am going to stick with the use of propane and waste oil to do the preheat.
Another way to maintain a high burner tube temperature without a firebox is to use a heat retaining ring around the first 6-8 inches of the burner tube. I plan on adding a square piece of steel tubing about 8" long that will over the first 8-9 inches of the burner tube. This should help reflect radiant heat back onto the burner tube and speed the heating of the tube. This should also allow the burner tube to operate on air only after a preheat period without a burner box or stove enclosure around the burner tube. This would be important since I would like to be able to run this burner inside of a boiler. The boiler inside surface will stay below 250 degrees since there will be water on the otherside of the boiler surface, so having this heat retaining tube around part of the burner tube will be necessary to allow this burner to work in a "cold" burner chamber which is basically what a boiler is when there is no burner box.
Putting the burner into the stove drove home the fact that consistent oil delivery is VERY important. Too much oil and there is a lot of smoke. Too little oil and not enough heat. Too much compressed air and the flame runs lean. Too little air and the burner runs rich and smokes some.
So while a ball valve "could" be used to regulate oil flow, it would be a constant PITA to keep the burner from running rich or lean. Overfiring would also be possible which is not at all good.
A gear pump for consistent feeding is a very good idea. I think the total cost of the gear pump setup I am assembling would be roughly $200 if the motor and drive were purchased from Automation Direct and the pump was purchased off Ebay. Not free, but this is a one time cost to burn a fuel that can be obtained for close to free!
Here are some pictures of the testing today:
Slightly smoky stack when run on low a little rich.. too much oil or too little compressed air.
The burner installed and running in the ancient cast iron stove.
Burner operating on low heat - with 8-10 psi or air and a proper supply of oil so no smoke.
The same burner tube running on 20 psi of air and a good supply of oil for minimum smoke. The heat was so intense that this is as close as I dared put the camera to the stove.
The radiant heat is very impressive.
I think that with the addition of a gear pump this would be a good manual burner setup as it is. Adding some controls would allow automatic operation.
My Original Ramblings late 2014
Here is a Babington "style" waste oil burner I have been working on and off for a couple of years. The Babington style burner design has been beat to death with little concrete results documented on the web for almost 10 years now. One article even declared the burner design a failure. You can find all kinds of Youtube videos of nice round balls or door knobs that are atomizing diesel fuel at 75 degrees F which is totally unrealistic. If it is 75 degrees then why are you running a burner?? You need to flip on the air conditioner!! The only thing available for burning real waste oil is Turk style pot burners which require maintenance, and a noisy electric blower powered by electricity. This burner makes flames and heat... The dirty oil does not pass through any orfices, so nothing to clog. I didn't try and get the oil film extremely thin on the nozzle after all we are burning waste oil, not diesel, sun flower or preheated veggie oil. No electricity is required to run this burner if you use a gravity feed. No compressed air is required to run this burner. So your compressor will stay quiet. (These concepts were later revised as development continued.. continue reading).
(SEE ADDITIONAL CONCLUSIONS AT END OF ARTICLE THAT RESULTED FROM FURTHER TESTING)
What is required is propane at 1-2 lbs per hour depending on how hard you want to run this burner. Remember this burner can be turned down! Total BTU output is between 60 and 300K BTU based on actual testing. One lb of propane is about 1/4.5 x 90 = 20,000 btu. So what happens is that you pay for propane at 1-2 lbs per hour which is 20-40,000 btu of propane and along with that you also burn up to 2 gallons of waste oil along with that. So the total heat output is actually a near 300,000 btu when running full tilt. The cost to run this burner at current local low volume propane prices of about $2.40/gallon is 2lbs/4.5lb/gal x $2.40 = $1.06 per hour for 300K btu assuming you get the waste oil for free. If you were to run just propane to get this much heat, the cost would be 300K btu/90K btu/gallon x $2.40 = $8.06 for 300K btu. I can live with just over a dollar per hour for 300K BTU of heat. That is very cheap heat. To put this into standard terms of dollars per million btu: 1million btu/300K btu x 1.06 = $3.53 / million btu of heat. (The final results are even cheaper than this.)
Not to put this into context check out this website: Fuel Cost Comparison So this is less than half the cost of heating with bulk coal (if you can buy it) and less than the cost to heat with wood if you can buy it for about $50 per cord!
I have been testing this design in 15 degree F ambient temperatures. This design is realistic and usable and doesn't require constant tweaking and fiddling to get it to run right. The amount of oil fed to the burner can be varied without creating smoke meaning that you can turn this burner down for use in moderate temperatures or turn it up when it is really cold.
This burner uses propane to atomize the waste oil, not compressed air. Compressed air works ok if the conditions are just right, the oil is preheated, and the oil is not too heavy, blah blah blah.... In other words compressed air is simply not practical! (REVISED AFTER FURTHER TESTING - see below)
Stay tuned, as this burner will be made available as a kit on Ebay at a reasonable price for experimental use. (IE, if you light your house on fire... don't blame me..as you are playing with FIRE! )
The kit will consist of the most of the parts in the picture. You will need to supply a propane cylinder with gas. A 20 lb unit will last for 10+ hours. And you will need to supply a source of waste oil under some slight pressure to feed the steel pipe tube that is above the pipe tee in the pictures. A gravity feed from 3 feet above the burner works fine. Optionally you can use a small motor driven gear pump to meter oil to the burner (recommended) or a peristalic pump.. That will allow you to pump the oil out of a container to the burner and then the unburnt oil can recirculate back to the tank.
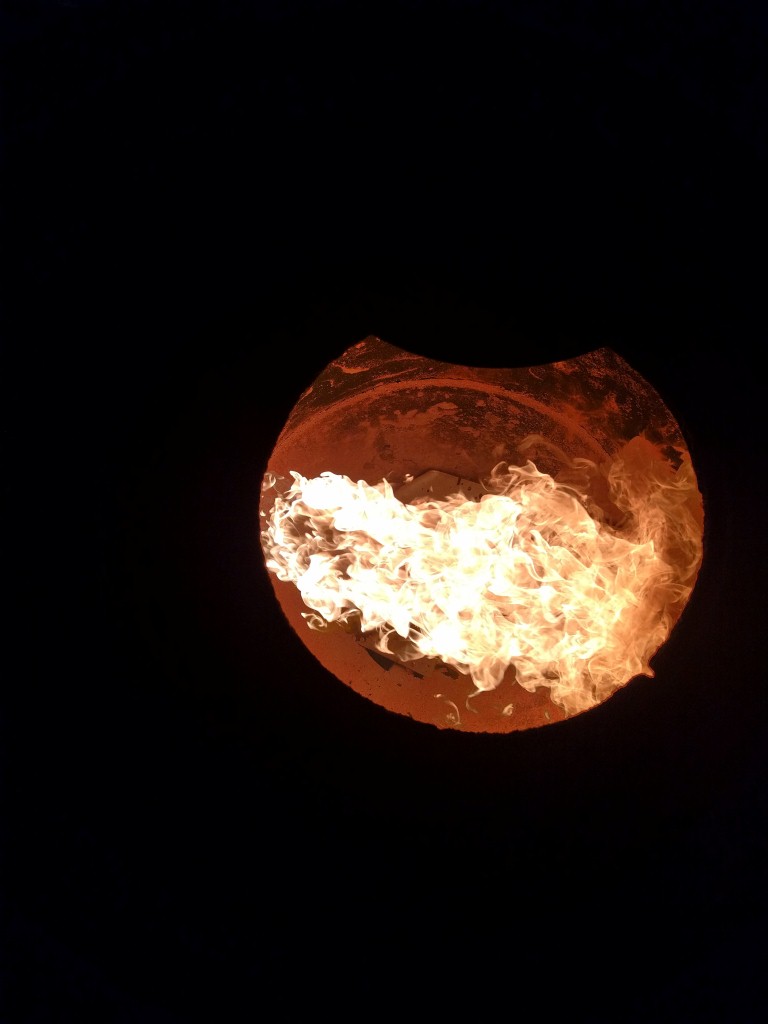
Below is a picture of the burner running on REAL waste oil. Most of this is 15W-40 and 10W-30 conventional oil with some synthetic added in. It is throwaway oil from engine oil changes. Those are bright yellow, whiteish flames with virtually no smoke.
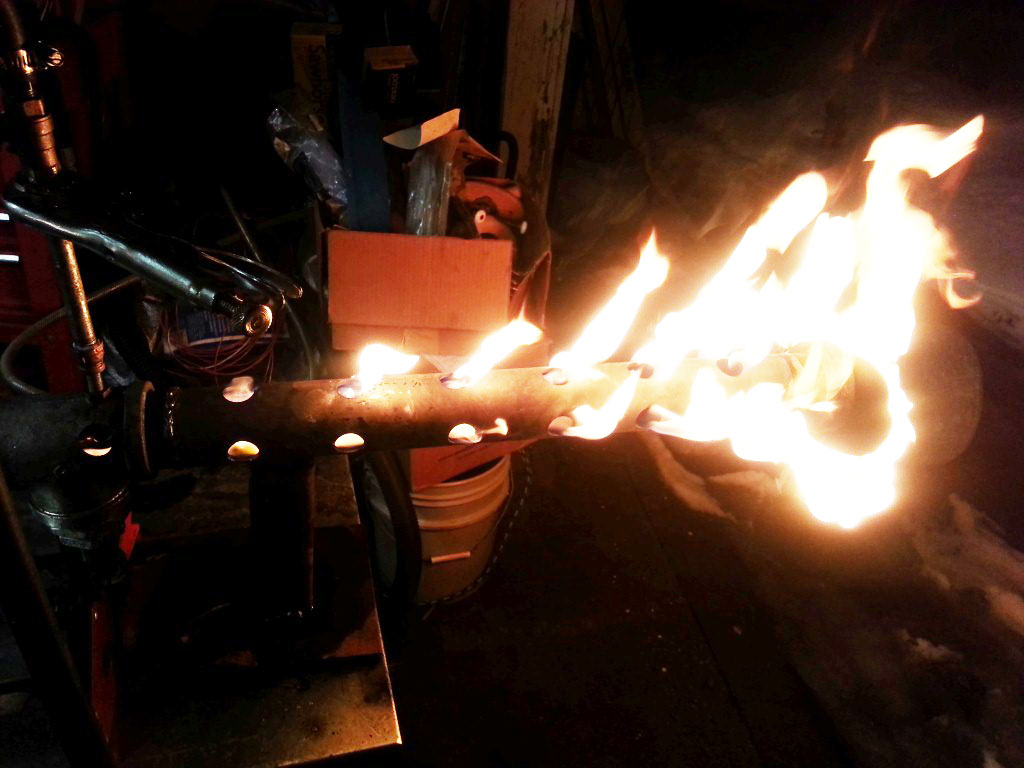
Here is the burner preheating on propane only. It takes about 3 minutes to bring the burner tube up to temperature (700+ degrees, which is required) in order to burn waste motor oil without smoke. This is with the propane setting at about 1.5 lbs per hour. (Notice the snow to the right... it was cold! )
Uses for this burner:
Put this into the end of a 55 gallon drum with exhast stack for a space heater. Weld a large pipe or cylinder into a 55 gallon drum or a 275 gallon oil storage tank and create an ambient pressure water heater. That water can be used to heat your house or shop or both!
Parts:
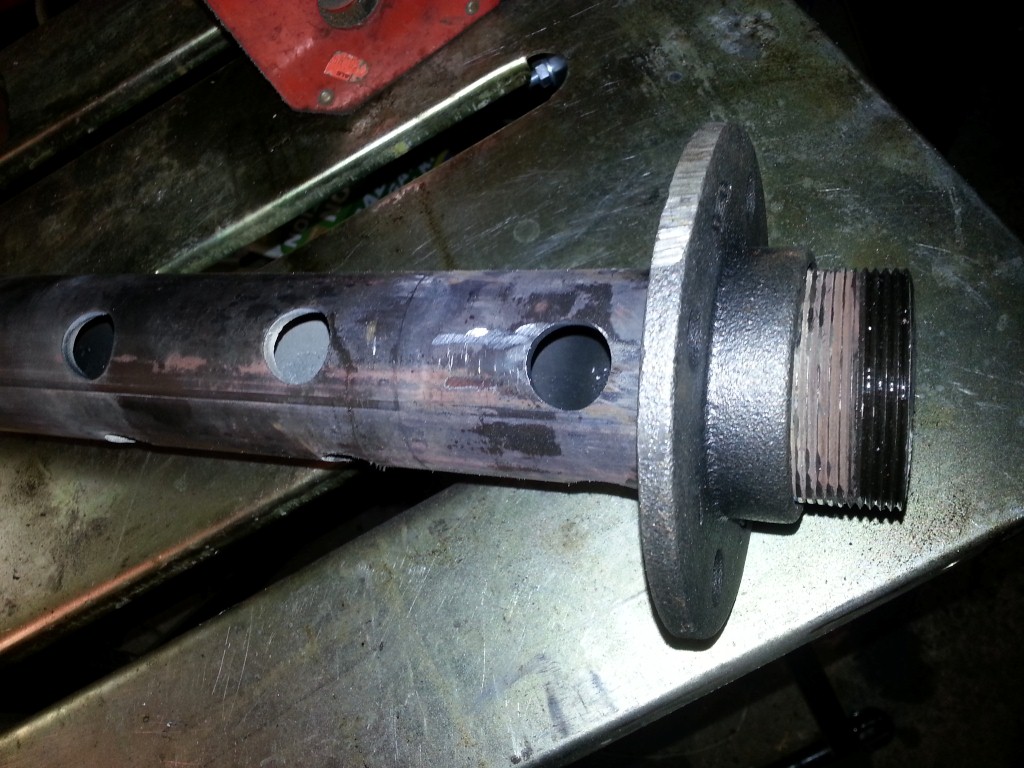
Here is a 2" black iron floor flange that I have bored out on a lathe so the burner tube can slide throught it. I am going to use this to mount the burner to a steel bulkhead on a wood burning stove. This could be valuable for many installations such as using this burner with a 55 gallon barrel for a space heater. This could also be used to adapt an existing wood burner or boiler to use this burner. I think the threaded flange was $12 at Home Depot.
A muffler exhast clamp could also be used to mount this burner tube.

The bored out iron flange with the burner tube slid though it.
Other Considerations:
Some type of flame safety needs to be implemented if this burner is operated in an enclosed space so that if the flame goes out a hazardous situation is not created. I may elaborate on this later, but a flame safety unit from an old oil heater could be used for this purpose.
Further thoughts:
After doing further reasearch on burners I found that gas assisted oil burners are rather rare. However there is a patent (which has expired) to use a gas assisted burner to burn crude oil in artic temperatures as a means of getting rid of waste crude oil. Waste oil is probably as uncertain in viscosity as crude oil. The patented deviced use a circular burner ring of gas flame around the oil jet of some sort. The patent is actually a little vague. If you do a google search for "gas assisted oil burner" it will pop up.After all who knows what they dump into the waste oil tanks at lube shops. A mixture of oils and antifreeze is not unusual.
I did find a bunker oil burner design patent that used two gas burner jets on both sides of the main oil burner jet but keep in mind that this was for high volumes of oil. Not 1-2 gallons per hour. Probably more like gallons per minute.
One of the challenges with any burner design and control is safety. It is normal to purge the combustion chamber prior to a startup to get rid of fumes that might ignite and explode. However waste oil burners (especially the one described above) is not really adaptable to standard oil furnaces. The flames are very long ( heavy oil ) and the burner tube is also very long (24" in the picture above). While a shorter tube is possible, I think that might cut down on effciency and make the burner more susceptable to smoking and limit the ability to "turn down" the burner. Right now this burner can be turned way down without smoking.
Oil feed systems: A gravity feed system for a burner that will be attended that is using propane to atomize the oil is reasonable, but it must be attended! If the oil runs out, the propane continues to run, but there will be reduced heat output. But no big deal, the person attending to the burner should be able to detect that there is an issue when the heat output is reduced and make corrections. For unattended operation (similar to the Murphy Machine automatic boiler design) a more reliable way of maintaining oil feed is needed. A constant flow system would be best so that it can be set and forgot. The most reliable way of doing that is with a gear type pump such as an oil burner pump! I have done testing with an old oil burner pump made by Suntec. In particular their J type pump which has apparently be made for decades. The pump I have will deliver a constant output flow when fed via gravity. I tried driving the pump with a variable speed drill at about 500 rpm. By varying the speed I can get a nice variation of oil flows. I have a small 3 phase motor that I will couple to the Suntec pump's 7/16" input shaft and then control the motor speed via a single phase input VFD. Another way to do this would be to use a standard 1/2" drill chucked onto the pump shaft and use a speed control unit to turn the drill speed down. An entire setup like that could be bought from Harbor Freight for probably $75. However I don't know how long a Harbor Freight 1/2" drill would last being run continously.
So I am rethinking a couple of things and these are the questions I have..and some conclusions:
\1. Can a gas assisted burner be used along with a babbington type ball atomizer be used to get the best of both worlds?? IE, reduced propane usage (below the current 1-2 lbs per hour) with the benefits of more complete combustion by the use of propane.
Conclusion: After some testing: Not easily and not without making the burner MUCH more complex. So I have stopped pursuing that.
\2. Can the propane jet be turned down when not running oil in such a way that it can be used as a pilot light? A couple of electric valves and two propane pressure regulators could be used to implement a two setting propane burner. This would facilitate unattended operation. Turn the gas on high, preheat the tube, add oil and burn at full output. Then when temp is reached, turn off the oil, wait for the oil to clear the burner, then reduce the gas flow and maintain a pilot.
Conclusion: (Revised) No, using the burner in a very large stove, the low pressure flame via the main jet becomes unstable at "low pilot level flows". This was a surprise since this was not a problem when the burner was running in the open.
\3. Can an induced draft be created in the furnace stack using compressed air to "suck" any vapors that are present out of the furnace? (Think "air jet" in the center of the exhaust stack pointing in the direction of the desired flow.) Using an air jet to purge the combustion chamber is: a. Simple! b. cost effective Using 20-30 cf of compressed air to purge the chamber a couple of times per day is much cheaper and simpler than installing and maintaining a blower do pressurize the chamber to blow out any fumes.
No conclusion yet.
\4. Is there any real advantage to preheating the oil to a constant temperature?? As long as the oil can be pumped, so far the answer I have for that is no. I can perceive no benefit But this has been a nagging question. The guys making burners to melt aluminum and iron have decided that preheating waste oil has no benefit for them but this is a different application. Preheating the oil to 150 degrees or so with electricity is fairly simple so it may be worth doing some experiementing.
No conclusion yet.
\5. Why does it appear that some people can just use air with their babinton type burner?
Conclusion: They can't! Read and watch closely and you will find that they have cut the oil with diesel or kerosene or paint thinner. Or they are operating the burner in warm weather with warm oil. Not realisitic. Try and find someone who runs a babinton style burner routinely to provide heat. I can't find any. (REVISED - see below)
\6. What about Delavan suction nozzles??
Conclusion: Many commerical burners use this nozzle. Also you will find many very frustrated users of these burners. That nozzle can only suction oil up 1/2" below the nozzle level. Any blockage or change in viscosity or antifreeze and you will get a flame out. Not good.
\7. What about burning synthetic oil.
Conclusion: (Revised) The key is a hot burner tube. If it is well above the flash point of synthetic oil, then that oil will burn just as well as conventional oil.